-
Connect the panelview display to 120Vac and to the ethernet. Apply power and verify that the display boots. If the HMI is not already in the BOOTP program, give it an address of ‘192.168.1.4’.
-
Follow the tutorial in the “1768 CompactLogix QuickStart guide“ (Publication ASIMP-QS003A-EN-P-October 2007) starting with chapter 12.
Note: You may need to set the screen resolution to 320x240 to be able to see all of the graphics
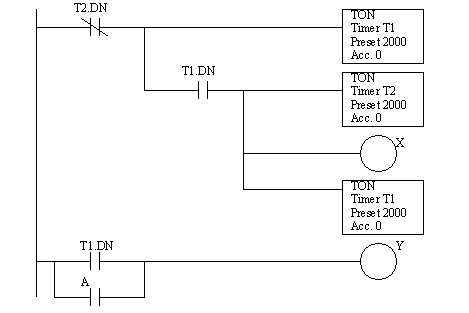
- Setup the system to run the following program. For the input A and outputs X and Y select unused points. Create a Panelview program that displays the values of X, Y, and the presets for the timers. The program should also allow the presets to be changed, and the value of A to be changed.

RSView (Not Hardware) with SoftLogix
-
Ensure that the Softlogix processor is running. Please note that you should not use an older project file. When doing this there are a number of issues with communication.
-
We will use OPC communication between the HMI and the Softlogix controller because they are on the same computer. This will require careful naming of the processor, in our case we will use ‘softlogix’ in multiple places. We will begin with a program in RSLogix.
-
Setup the system to run the following program. For the input A and outputs X and Y select unused points.
-
Download the program and test it.
-
Next we will export the tags to be used in the HMI by selecting “File”/”Saveas”. Pick a file name such as “tutorial” in the “C:\temp” directory and change the file type to “RSLogix5000 Import/Export File [*.L5K]”.
-
Minimize the window.
-
Open RSLinx and use “RS-Who”. Check for the “SOFT5-1 Ethernet” driver. If it is not present use “Communications”/”Configure Drivers” and under “Available Driver Types” select “Softlogix 5 driver” then “Add new”.
-
In “RSWho” expand the “SOFT1-ETHERNET”. Right click on the “softlogix” processor [note: this is the same name as before]. and select “Configure new DDE/OPC topic”. Under the “topic list” delete all of the existing entries. (Note: we will do this to start fresh.) Add a new topic called “softlogix”. To the right click on the “softlogix, Softlogix 5” and then “apply” and “done”. We should now be ready to set up the HMI.
-
Select “All Programs”/”Rockwell Software”/”RSView32 Tools”/”Logix 5000 Tag Import”. On the top line select “RSView32 7.00 or later versions”. Enter “softlogix” for the “node name”. Beside “Tag file name” select “Browse” and locate the file saved in RSLogix. Choose “Select All”. (Normally we would choose only those we need, but here we will be sloppy and select all.) “OK” will save the tags in a CSV (Comma Separated Variable) file that will be used later. Close the program.
-
Open “RSView32 Works”. Use “File”/”New” to create a new project. Save it in the “C:\temp” directory with a name such as “tutorial”.
-
On the left hand side are basic components. Start by double clicking on “System”. The “Channel” and “Node” items are used for setting up communications. To set up OPC communication double click on “Node”. Select “OPC Server”, for the “name” use “softlogix” and make sure the enable box is checked [note, this is the name used before]. For the “Server” click on the button with three dots and select “RSLinx OPC Server” and set the “Type” to “local”. Set the “access path” to “softlogix”. When done, use “Accept” and then close the dialog window.
-
It is now time to import the tags from the CSV file created previously. Select “Project”/Import & Export Wizard” and choose “Import RSView CSV files”, then “Next”. Uncheck the boxes for “Derived Tags”, “Alarms”, and “Data Logs” then locate the CSV file created before. Select “Next” then “Skip Existing”. (Note: we would not do this if updating an existing project.) Click through until the tags are imported. If all has gone well the tags should be accessible through “Tag Database” and “Tag Monitor”.
-
Open the “Tag Monitor” window and enter a tag name of “X”. Look at all of the items on the line. The value should be “valid” and changing between “on” and “off”. Try the tag “C\ACC”.
-
Now that the tags are functioning it is time to create a simple interface. Open “Graphics” and right click on “Display” then select “New” to create a new display window. Select “Objects”/”Advanced Objects”/”Trend”. Move the cursor to the display window and draw a large rectangle by dragging mouse (with the left button). In the dialog window change the settings to the values shown below. After this close the window and save it as “tutorial_main”.
Control Rate: 1s
Pen 1: X
Pen 2: C\ACC
-
Run the HMI by selecting the “Run Mode” tab, and then select “tutorial_main” and then click “Start”.
-
Stop the HMI and return to edit the “tutorial_main” display. Click on the “tren” item created before and delete it. Next, add some freeform text to the screen that says “Artful Dodger Recycling”.
-
Add a button with the following attributes.
Style: beveled
Actions: Reset C\ACC
Up Appearance Button Label: Reset Count
-
Add a “Numeric Display” for the expression use “C\ACC” and “center justify”.
-
Run the project and verify that you can now reset the counter.
-
Return to the edit mode and create a new display. Add the following items and then close in and save it as “tutorial preset”.
Text: “New Counter Setpoint”
Numeric Input: Tag Name “C\PRE”
Beveled Button: Action Command “Display tutorial_main”, Up Appearance Button Label “Main Screen”
-
Open the “tutorial_main” screen and add a beveled button with the text “change preset” and set the “action” “command” to “Display tutorial_preset”.
-
On the “tutorial_main” screen draw a circle and then right click and select “Animation”, “Color”. For the expression use “C\ACC >= C\PRE” and change the color for “A) 0” to black and yellow. Close the window and save the changes
-
Run the program and verify the operation.